

Most renovation checklists cover the obvious items: kitchens, bathrooms, flooring, paint colours. Window treatments tend to get bolted on at the very end, often as an afterthought once the bigger, more visible decisions have already been made. That is a missed opportunity, because roller shutters are far easier and cheaper to incorporate when they are planned alongside the renovation itself, rather than added after the fact.
Why Shutters Get Left Off the Renovation Checklist
Roller shutters are not always top of mind during renovation planning because they are functional rather than decorative, and homeowners are often focused on the changes they will see and use every day. The problem is that windows and door openings are usually finalised early in a renovation, along with the electrical rough-in, wall linings and external cladding. By the time a homeowner starts thinking seriously about shutters, several of the building elements that make installation straightforward have already been closed up.
The Case for Planning Shutters Early
Design and Structural Considerations
Shutters need housing space above the window, a clear track down each side, and in the case of motorised systems, power connected to the right location. All of this is simple to accommodate during a renovation, when walls are open and an electrician is already on site. Retrofitting the same shutter onto a finished wall means cutting into existing linings, patching around new conduit, and matching paint and render on surfaces that were never meant to be reopened.
Cost Savings of Planning Ahead
Builders and window suppliers who know shutters are coming can plan window sizes, reveals and external finishes accordingly, avoiding compromises that come from fitting a shutter to an opening that was never designed for one. Electrical work for motorised shutters is also dramatically cheaper when it happens during a renovation’s rough-in stage rather than as a standalone job requiring an electrician to return, open up a wall, and make good the damage afterward.
|
Approach |
Typical Cost Impact | Disruption |
| Planned during renovation | Lower, integrated into existing trades | Minimal, no rework needed |
| Retrofitted after renovation | Higher, standalone job with dedicated call-outs |
Moderate to high, may require patching walls or render |

(Roller shutters part of overall window renovation. Credit: brizmaker/iStock)
Permits and Approvals
Depending on the scope of a renovation and the specific council area, external alterations including shutters can sometimes fall within a building permit’s scope, particularly on heritage overlays or in planning zones with restrictions on street-facing changes. The Victorian Building and Plumbing Commission provides guidance on when a building permit is required for residential work, which is worth checking early in the planning process rather than after shutters have already been ordered.
Raising shutters with your builder or architect at the same time as other structural and planning discussions means any permit requirements are dealt with alongside the rest of the renovation approval, rather than as a separate, delayed process later.
Matching Shutters to Your Renovation’s Design
Beyond the practical planning benefits, factoring shutters in early also gives homeowners more control over how they look once finished. Colours, slat profiles and housing styles can be chosen to match new external cladding, window frames or render, rather than being selected afterward to work around finishes that are already locked in. Homeowners who add shutters as an afterthought often end up compromising on colour matching or housing visibility simply because the surrounding surfaces were finished without shutters in mind.
This is particularly relevant for renovations that involve a change of external colour scheme or cladding material. Choosing shutter colours and housing finishes at the same time as these broader material decisions means the final result looks like it was designed as one cohesive package, rather than an addition bolted on after the fact.
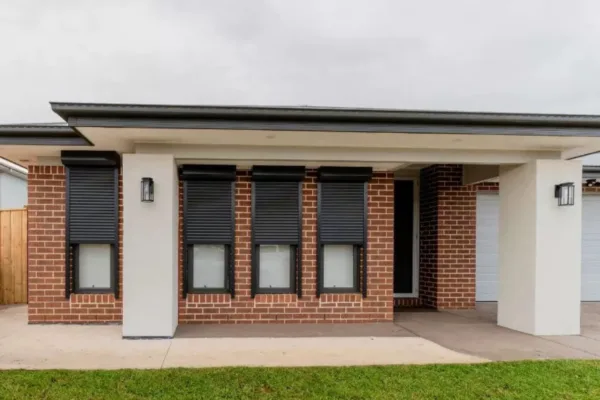
(Planned security shutters with new build. Credit: Titan Shutters)
What to Discuss With Your Renovation Team
Before finalising window and door plans, it is worth raising a few specific points with your builder, architect or window supplier:
- Which windows and doors are likely candidates for shutters, based on sun exposure, street visibility or noise
- Whether housing space and track clearance have been allowed for in the current window specifications
- Where power will need to run for any motorised shutters, and whether that can be included in the electrical rough-in
- What the external finish will look like once shutters are fitted, so it can be factored into render, cladding or paint decisions
Getting Shutters Specified Correctly the First Time
Because shutters interact with so many other parts of a build, window sizing, electrical work, external finishes, it helps to bring a shutter supplier into the conversation while plans are still being finalised rather than after windows have been ordered. Booking a free design consultation is one practical way to confirm exactly what needs to be allowed for before a renovation’s window and electrical decisions are locked in. Getting this right at the planning stage avoids the far more expensive and disruptive alternative of retrofitting shutters onto a home that has already been finished.
Timing It Right With Your Build Program
Most builders work through a renovation in a fairly predictable sequence: structural work, then rough-in trades like electrical and plumbing, then wall linings, then external finishes. Shutters fit most cleanly into that sequence at the rough-in stage, alongside the electrician, rather than being treated as a finishing touch once the build is close to complete. Homeowners who raise shutters during the initial design and trade scheduling conversations, rather than partway through construction, tend to avoid the variation costs and delays that come from asking trades to revi
